Some simple knowledge of PyG
Basic
Data
A single graph in PyG is described by an instance of
torch_geometric.data.Data, which holds the following
attributes by default:
data.x: Node feature matrix
[num_nodes,num_node_features_dim]
data.edge_index: Graph connectivity in COO
format with shape [2, num_edges] and type
torch.long
data.edge_attr: Edge feature matrix with shape
[num_edges, num_edge_features_dim]
data.y: Target to train(label). e.g.,
node-level targets of shape [num_nodes, *] or graph-level
targets of shape [1, *]
...
example:
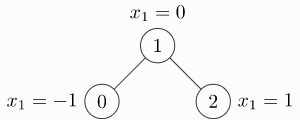 image-20230523172031612
1
2
3
4
5
6
7
8
9
10
11
12
| import torch
from torch_geometric.data import Data
edge_index = torch.tensor([[0, 1],
[1, 0],
[1, 2],
[2, 1]], dtype=torch.long)
x = torch.tensor([[-1], [0], [1]], dtype=torch.float)
data = Data(x=x, edge_index=edge_index.t().contiguous())
>>> Data(edge_index=[2, 4], x=[3, 1])
|
Note: Although the graph has only two edges, we
need to define four index tuples to account for both directions of an
edge.
operation
1
2
3
4
5
6
7
8
9
10
11
12
13
14
15
16
17
18
19
20
21
22
23
24
25
26
27
28
29
30
31
32
33
34
35
36
37
| print(data.keys)
>>> ['x', 'edge_index']
print(data['x'])
>>> tensor([[-1.0],
[0.0],
[1.0]])
for key, item in data:
print(f'{key} found in data')
>>> x found in data
>>> edge_index found in data
'edge_attr' in data
>>> False
data.num_nodes
>>> 3
data.num_edges
>>> 4
data.num_node_features
>>> 1
data.has_isolated_nodes()
>>> False
data.has_self_loops()
>>> False
data.is_directed()
>>> False
device = torch.device('cuda')
data = data.to(device)
|
Minibatch
1
2
3
4
5
6
7
8
9
10
11
12
| from torch_geometric.datasets import TUDataset
from torch_geometric.loader import DataLoader
dataset = TUDataset(root='/tmp/ENZYMES', name='ENZYMES', use_node_attr=True)
loader = DataLoader(dataset, batch_size=32, shuffle=True)
for batch in loader:
batch
>>> DataBatch(batch=[1082], edge_index=[2, 4066], x=[1082, 21], y=[32])
batch.num_graphs
>>> 32
|
Message Passing Network